Telegram Bots: The First Steps
Publication date: 2024-10-08Telegram bots have become a popular tool for automating tasks, integrating services, and even creating new experiences for users. In this post, I’ll walk you through how to set up your first Telegram bot using the grammY library, a powerful and easy-to-use Node.js framework for building Telegram bots. This guide is for developers who want to get started with Telegram bot development using modern tools and frameworks.
Why grammY?
grammY is a lightweight, modern framework that allows developers to create bots quickly and efficiently. It supports modern JavaScript (ES6+), has excellent documentation, and provides flexibility for both simple and complex bots. Whether you’re creating a small bot for personal use or a scalable bot for thousands of users, grammY has you covered.
Since grammY primarily handles communication with the Telegram API, additional packages are needed to create a fully functional bot application. These packages could include tools for parsing command-line arguments, running the bot as a web server, loading configuration parameters, logging, and more. To address these needs, I use my own toolkit based on dependency injection (@teqfw/di). The entry point for this toolkit when building Telegram bots is the package @flancer32/teq-telegram-bot.
Setting Up Your Development Environment
Before building your Telegram bot, ensure that you have the following:
- Node.js and npm installed.
- Git for version control.
- A code editor of your choice (e.g., VS Code or PhpStorm).
You will also need to register your bot with Telegram and obtain an access token for the Telegram API. The token will look something like this:
4839574812:AAFD39kkdpWt3ywyRZergyOLMaJhac60qc
Initializing Your Bot Project
Now that your development environment is ready, it’s time to set up the project for your Telegram bot. In this section, we will create a new directory for your bot, initialize a Node.js project, configure some basic settings, and install the necessary dependencies. Follow the commands below to get started:
$ mkdir ./my-bot
$ cd ./my-bot
$ git init
$ git config –global init.defaultBranch main
$ npm init -y
$ npm pkg set name=“my-bot”
$ npm pkg set version=“0.1.0”
$ npm pkg set type=“module”
$ npm pkg set description=“Telegram Bots: The First Steps”
$ npm pkg set author=“Your Name your@email.com”
$ npm install @flancer32/teq-telegram-bot –save This will set the foundation for building your Telegram bot using the grammY framework and other tools we will introduce later.
Creating the Entry Point
Create the entry point for your application by adding the following content to the ./bin/tequila.mjs file:
#!/usr/bin/env node
‘use strict’;
import {dirname, join} from ‘node:path’;
import {fileURLToPath} from ‘node:url’;
import teq from ‘@teqfw/core’; const url = new URL(import.meta.url);
const script = fileURLToPath(url);
const bin = dirname(script);
const path = join(bin, ‘..’);
teq({path}).catch((e) => console.error(e));
Then, make the script executable:
$ chmod a+x ./bin/tequila.mjs To verify that the application is working, run the script:
$ ./bin/tequila.mjs Expected output:
10/07 10:30:09.627 (info TeqFw_Core_Back_App): Starting teq-app
…
Usage: [options] [command] Options:
-h, –help display help for command
Commands:
core-version get version of the application
web-server-start [options] start the web server
web-server-stop stop web server
tg-bot-start start the bot in the long polling mode
tg-bot-stop stop the bot has been started in the long polling mode
help [command] display help for command
10/07 10:30:09.710 (info TeqFw_Core_Back_App): Stopping the teq-plugins for
10/07 10:30:09.710 (info TeqFw_Core_Back_App): The teq-app
You can see the list of default commands, including starting and stopping the bot in long polling mode and managing the web server (webhook mode).
Configuring the Bot
In my applications, I prefer loading configuration parameters through JSON files. JSON files (along with YAML and XML) have an internal structure, which is convenient for storing configuration data in modular architectures and when dealing with a large number of parameters.
For a basic bot, we only need to pass the Telegram API access token to the @flancer32/teq-telegram-bot package. Create the file ./cfg/local.json with the following content:
{
“@flancer32/teq-telegram-bot”: {
“apiKeyTelegram”: “4839574812:AAFD39kkdpWt3ywyRZergyOLMaJhac60qc”
}
} ### Configuring Git
It’s important to ensure that configuration files and npm packages are not included in version control. Let’s create a ./.gitignore file with the following content:
/**/node_modules/
/**/package-lock.json
/**/tmp/
/.idea/
/.vscode/
/cfg/local.* Now we can add our code to the project’s Git repository:
$ git add .
$ git status
On branch main No commits yet
Changes to be committed:
(use “git rm –cached
new file: .gitignore
new file: bin/tequila.mjs
new file: package.json
$ git commit -m “Initial commit: setup project structure and configuration”
Verifying the Initialization
If everything has been set up correctly, attempting to start the bot in long polling mode should display a message indicating that the corresponding methods need to be implemented:
$ ./bin/tequila.mjs tg-bot-start
…
10/07 13:15:21.223 (error Telegram_Bot_Back_Cli_Start): Please implement this method.
Error: Please implement this method.
at Telegram_Bot_Back_Api_Setup.commands (file:///…)
…
Customizing Your Bot
The @flancer32/teq-telegram-bot package provides the foundation for running your bot in both long polling and webhook modes, as well as basic bot configuration. However, adding commands to the bot and handling those commands is the responsibility of the developer. For this purpose, the package includes the Telegram_Bot_Back_Api_Setup interface (a standard JavaScript class where all methods throw an exception with the message “Please implement this method.”).
Since I use IoC (Inversion of Control) for development, which involves creating and injecting dependencies into a container of objects, the task of customization involves implementing this interface and configuring the dependency container to use the implementation instead of the interface. This sounds more complicated than it actually is.
To add custom logic to your bot, you need to create an ES6 module that exports a class implementing the Telegram_Bot_Back_Api_Setup interface. Let’s create a directory ./src/Back/Bot and a file ./Setup.js within it:
$ mkdir -p ./src/Back/Bot
$ touch ./src/Back/Bot/Setup.js Now, add the following content to the ./src/Back/Bot/Setup.js file:
export default class MyBot_Back_Bot_Setup {
constructor() { this.commands = async function (bot) {
return bot;
};
this.handlers = function (bot) {
return bot;
};
}
}
Next, you need to configure the IoC so that the dependency container can find and use the implementation of the interface. This configuration is part of the project code and is set up in the ./teqfw.json file instead of the ./cfg/local.json file. Both files (./src/Back/Bot/Setup.js and ./teqfw.json) are part of the project’s codebase and should be included in version control.
Here is the content of the ./teqfw.json file:
{
“@teqfw/di”: {
“autoload”: {
“ns”: “MyBot”,
“path”: “./src”
},
“replaces”: {
“Telegram_Bot_Back_Api_Setup”: {
“back”: “MyBot_Back_Bot_Setup”
} } } } The@teqfw/didependency container locates the source code in a manner similar to PHP’s PSR-4 standard. In our case, theMyBotnamespace maps to the./srcdirectory. Additionally, there is an instruction for the container to replace theTelegram_Bot_Back_Api_Setupinterface with its implementationMyBot_Back_Bot_Setup.
Now, when you start the bot, you will no longer receive error messages:
$ ./bin/tequila.mjs tg-bot-start
…
10/07 13:19:01.381 (info Telegram_Bot_Back_Mod_Bot): All command handlers are set for the bot.
10/07 13:19:01.381 (info Telegram_Bot_Back_Mod_Bot): The Telegram bot is initialized.
10/07 13:19:01.420 (info Telegram_Bot_Back_Cli_Start): The bot is started in the long polling mode. ### Creating Basic Bot Commands
There are three basic commands that should be present in every Telegram bot:
- /start: Initiates the user’s interaction with the bot (connecting to the bot).
- /help: Allows the user to request information on how to use the bot.
- /settings: Lets the user configure the bot’s settings.
Let’s add these commands to our MyBot_Back_Bot_Setup class:
export default class MyBot_Back_Bot_Setup {
constructor() {
this.commands = async function (bot) {
await bot.api.setMyCommands([
{command: ‘help’, description: ‘Display this text.’},
{command: ‘settings’, description: ‘Configure bot settings.’},
{command: ‘start’, description: ‘Start using the bot.’},
]);
return bot;
};
}
} In this code, the bot parameter in the commands method is a grammY object with the appropriate API. This method is called when the bot starts (both in long polling mode and webhook mode) and creates the list of commands for the user.
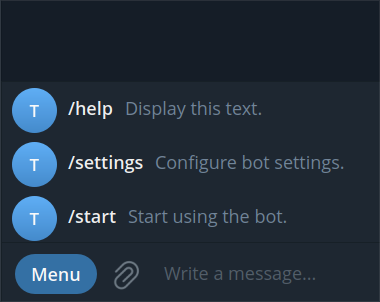
The commands in desktop Telegram
The commands in Telegram will appear as a quick-access menu, making it easier for users to interact with your bot.
Creating Command Handlers for Your Bot
In this example, we’ll consider the simplest case where the command handler simply sends a message to the user. Let’s add handlers for all three commands to our MyBot_Back_Bot_Setup class:
export default class MyBot_Back_Bot_Setup {
constructor() {
this.handlers = function (bot) {
bot.command(‘help’, (ctx) => {
const msg = `
Available commands: /help - Display this text.
/settings - Configure bot settings.
/start - Start using the bot.
`
;
ctx.reply(msg, {
parse_mode: ‘HTML’,
});
});
bot.command(‘settings’, (ctx) => {
ctx.reply(‘Configure bot settings.’);
});
bot.command(‘start’, (ctx) => {
ctx.reply(‘Start using the bot.’);
});
return bot;
};
}
}
Here you can see all three commands in action:
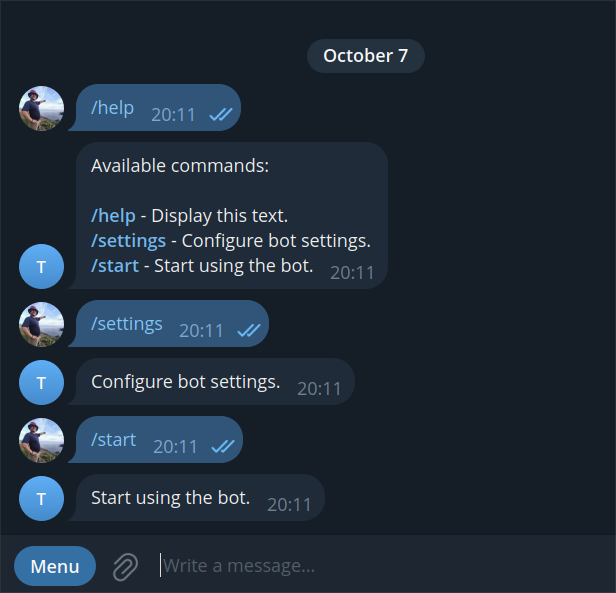
All commands in action
Conclusion
Congratulations! You’ve successfully set up a basic Telegram bot using the grammY framework. With this solid foundation, you can continue to expand your bot’s capabilities, adding new features and commands to enhance user interaction.
You can find the code for this project in the @flancer64/tg-demo-base repository.
Happy coding!
If you enjoyed this article, please give it a clap and follow me for more content!
Stay connected:
Thank you for your support!